Recently, while browsing “What Worth Buying”, I saw that the
[Wandering Earth 2] collaboration internet host key power bank was on sale,
https://post.smzdm.com/p/aev3zw74/
Originally priced at 200-300 yuan, faulty ones are about 40-50 yuan, working ones about 80-90 yuan.
Spending 200 yuan on a power bank that can’t fly is a big smart move,
Spending 90 yuan on a collaboration figurine, what else do you want?
So, I ordered one. When it arrived, it looked like this:
A digital tube display screen, with three buttons below to control the display functions.
You can even see the charging power and battery level~
It works, it’s heavy, not suitable for going out.
It’s really just a figurine toy.
After two days, I thought again, why not dismantle this thing,
Connect the display screen to my own device,
Write a program on the device that supports Authenticator 2FA,
Make it a real “internet host key” device?
Let’s do it.
First, choose a hardware board, needs to be small, and can drive the display screen.
I looked at ESP32, it’s suitable, enough IO ports,
Can drive small displays, can connect to WIFI,
Price is cheap~
Choose a hardware board -> ESP32C3
Went on Taobao and looked around, finally found an ESP32C3 board.
Supports USB-C, plug into computer and it’s done.
No drivers needed, even works on macOS directly~
Development framework -> micropython
After looking at development frameworks, I found micropython is the simplest.
boot.py is built-in to the framework, your own logic goes in main.py,
IO ports and network are built-in, most needed drivers can be found as third-party libraries.
However, you need to flash the firmware yourself -> Getting Started with MicroPython on ESP32.
 1
 2
 3
 4
 5
 6
 7
 8
 9
10
11
12
13
14
15
16
17
18
19
20
21
22
| # Install esptool
pip install esptool
# Erase device
## macOS or linux
esptool.py --port /dev/ttyUSB0 erase_flash
## windows
python esptool --port COM6 erase_flash
# Press boot key, execute flash firmware
# Download link: https://micropython.org/download/ESP32_GENERIC_C3/
# For other versions, see for yourself
esptool.py --chip esp32 --port /dev/ttyUSB0 --baud 460800 write_flash -z 0x0000 micropython.bin
## Windows version
python esptool --port COM6 --baud 460800 write_flash -z 0x0000 micropython.bin
## After flashing successfully, power off and restart
After flashing successfully, power off and restart.
|
Verify micropython environment
The simplest way is VS Code Pymakr plugin: Pymakr - Visual Studio Marketplace
After installing, in the left sidebar, click the "
" icon, select “List Device”.
If ListDevice doesn’t appear or reports an error,
You may need to install Nodejs runtime. (Encountered on Windows: choco install nodejs done.)
Then click “Device COM”, select “Connect” icon, then select “Terminal” icon.
After selecting the terminal icon, you can see this command line interface, indicating micropython environment is good.
If you see errors, probably the firmware above wasn’t flashed correctly.
Try flashing the firmware again.
PS: May need to switch –baud 460800, specifically see micropython docs or ask AI
esptool.py –chip esp32 –port /dev/ttyUSB0 –baud 460800 write_flash -z 0x0000 micropython.bin
Choose a screen -> 2.25 inch long strip screen
Choosing a screen was a big problem. Searched around, hard to find this specification screen.
This thing’s display area: 1.8CM high, 15CM wide, long strip.
Searched Taobao, couldn’t find similar specs.
Finally settled for: 2.25 inch TFT LCD screen.
Supports ST7789 (micropython has st7789.py driver).
The display’s 8P interface is respectively: GND, VCC, SCL, SDA, RST, DC, CS, BL.
Facing the ESP32 pins, just connect them one by one on the right.
ESP32 pins are: GND, 3.3V, GPIO02, GPIO03, GPIO02, GPIO10, GPIO06, GPIO07
Corresponding code:
Your wiring: SCL, SDA, RST, DC, CS -> GPI002, GPI003, GPI010, GPI006, GPI007
SCK_PIN = 2 # SCL pin (clock) -> GPI002
MOSI_PIN = 3 # SDA pin (data) -> GPI003
RST_PIN = 10 # RST pin (reset) -> GPI010
DC_PIN = 6 # DC pin (data/command) -> GPI006
CS_PIN = 7 # CS pin (chip select) -> GPI007
————-
Finally, the screen’s BE pin connects to another GND. (I didn’t figure this out either, tested it out)
Then the screen lights up.
“Showtime”: Project code
-rw-r–r– 1 liguobao staff 6.3K 7 30 11:05 http_server.py
-rw-r–r– 1 liguobao staff 4.3K 7 30 11:05 main.py
-rw-r–r– 1 liguobao staff 265B 7 20 13:53 pymakr.conf
-rw-r–r– 1 liguobao staff 1.6K 7 30 11:05 show_text.py
-rw-r–r–@ 1 liguobao staff 30K 7 22 15:19 st7789.py
-rw-r–r–@ 1 liguobao staff 3.6K 7 22 15:19 vga1_8x8.py
st7789 and vga1 come from: https://github.com/russhughes/st7789py_mpy/
Connect WIFI + Implement HTTP service
http_server.py
  1
  2
  3
  4
  5
  6
  7
  8
  9
 10
 11
 12
 13
 14
 15
 16
 17
 18
 19
 20
 21
 22
 23
 24
 25
 26
 27
 28
 29
 30
 31
 32
 33
 34
 35
 36
 37
 38
 39
 40
 41
 42
 43
 44
 45
 46
 47
 48
 49
 50
 51
 52
 53
 54
 55
 56
 57
 58
 59
 60
 61
 62
 63
 64
 65
 66
 67
 68
 69
 70
 71
 72
 73
 74
 75
 76
 77
 78
 79
 80
 81
 82
 83
 84
 85
 86
 87
 88
 89
 90
 91
 92
 93
 94
 95
 96
 97
 98
 99
100
101
102
103
104
105
106
107
108
109
110
111
112
113
114
115
116
117
118
119
120
121
122
123
124
125
126
127
128
129
130
131
132
133
134
135
136
137
138
139
140
141
142
143
144
145
146
147
148
149
150
151
152
153
154
155
156
157
158
159
160
161
162
163
164
165
166
167
168
169
170
171
172
173
174
175
176
177
178
179
180
181
182
183
184
185
186
187
188
189
190
191
192
193
194
195
196
197
198
199
| import network
import time
import socket
#from show_text import display_text_on_tft
# --- WiFi Network Configuration List ---
WIFI_NETWORKS = [
{"ssid": "xiaomi_505", "password": "password"},
{"ssid": "miaowuwu_505", "password": "password"}
]
def connect_wifi(ssid, password):
"""Connect to the specified WiFi network"""
wlan = network.WLAN(network.STA_IF)
wlan.active(True)
if not wlan.isconnected():
print(f"Connecting to WiFi: {ssid}")
wlan.connect(ssid, password)
for _ in range(15): # Wait up to 15 seconds
if wlan.isconnected():
ip_address = wlan.ifconfig()[0]
print(f"Connection successful, IP address: {ip_address}")
return ip_address
time.sleep(1)
print(f"WiFi connection failed: {ssid}")
return None
else:
ip_address = wlan.ifconfig()[0]
print(f"WiFi already connected, IP address: {ip_address}")
return ip_address
def connect_to_available_wifi():
"""Try to connect to available WiFi networks"""
print("Starting to scan and connect to available WiFi networks...")
wlan = network.WLAN(network.STA_IF)
wlan.active(True)
# If already connected, return IP address directly
if wlan.isconnected():
ip_address = wlan.ifconfig()[0]
print(f"WiFi already connected, IP address: {ip_address}")
return ip_address
# Scan available WiFi networks
print("Scanning WiFi networks...")
networks = wlan.scan()
available_ssids = [net[0].decode('utf-8') for net in networks]
print(f"Scanned networks: {available_ssids}")
# Try to connect to configured WiFi networks
for wifi_config in WIFI_NETWORKS:
ssid = wifi_config["ssid"]
password = wifi_config["password"]
if ssid in available_ssids:
print(f"Found configured network: {ssid}, trying to connect...")
ip_address = connect_wifi(ssid, password)
if ip_address:
return ip_address
else:
print(f"Network not found: {ssid}")
print("Unable to connect to any configured WiFi network")
return None
def url_decode(text):
"""Simple URL decoding"""
text = text.replace('+', ' ')
text = text.replace('%20', ' ')
text = text.replace('%21', '!')
text = text.replace('%22', '"')
text = text.replace('%23', '#')
text = text.replace('%24', '$')
text = text.replace('%25', '%')
text = text.replace('%26', '&')
text = text.replace('%27', "'")
text = text.replace('%28', '(')
text = text.replace('%29', ')')
text = text.replace('%2A', '*')
text = text.replace('%2B', '+')
text = text.replace('%2C', ',')
text = text.replace('%2D', '-')
text = text.replace('%2E', '.')
text = text.replace('%2F', '/')
return text
def handle_request(tft, conn):
"""Handle HTTP request"""
try:
request = conn.recv(1024).decode('utf-8')
print(f"Received request:\n{request}")
# Parse request line
lines = request.split('\n')
if lines:
request_line = lines[0]
parts = request_line.split(' ')
if len(parts) >= 2:
method = parts[0]
path = parts[1]
print(f"Method: {method}, Path: {path}")
if method == 'GET':
# Parse query parameters
if '?' in path:
path_part, query_part = path.split('?', 1)
params = {}
for param in query_part.split('&'):
if '=' in param:
key, value = param.split('=', 1)
params[key] = url_decode(value)
# Get text parameter
received_text = params.get('text', None)
else:
received_text = None
if not received_text:
response = """HTTP/1.1 400 Bad Request\r
Content-Type: text/plain\r
Connection: close\r
\r
Bad Request: 'text' parameter is required"""
print("Missing 'text' parameter in request")
conn.send(response.encode('utf-8'))
conn.close()
return
print(f"Text extracted from GET request: '{received_text}'")
show_text = f"Received Text:\n{received_text}"
# Display code
# display_text_on_tft(tft, show_text)
# Send success response
response = """HTTP/1.1 200 OK\r
Content-Type: text/plain\r
Connection: close\r
\r
Text received and displayed!"""
else:
# Method not allowed
response = """HTTP/1.1 405 Method Not Allowed\r
Content-Type: text/plain\r
Connection: close\r
\r
Method Not Allowed. Only GET is supported."""
else:
response = """HTTP/1.1 400 Bad Request\r
Content-Type: text/plain\r
Connection: close\r
\r
Bad Request"""
else:
response = """HTTP/1.1 400 Bad Request\r
Content-Type: text/plain\r
Connection: close\r
\r
Bad Request"""
conn.send(response.encode('utf-8'))
except Exception as e:
print(f"Error handling request: {e}")
try:
error_response = """HTTP/1.1 500 Internal Server Error\r
Content-Type: text/plain\r
Connection: close\r
\r
Internal Server Error"""
conn.send(error_response.encode('utf-8'))
except:
pass
finally:
conn.close()
def start_http_server(tft, ip_address, port=80):
"""Start HTTP server"""
addr = socket.getaddrinfo(ip_address, port)[0][-1]
s = socket.socket()
s.setsockopt(socket.SOL_SOCKET, socket.SO_REUSEADDR, 1)
s.bind(addr)
s.listen(1)
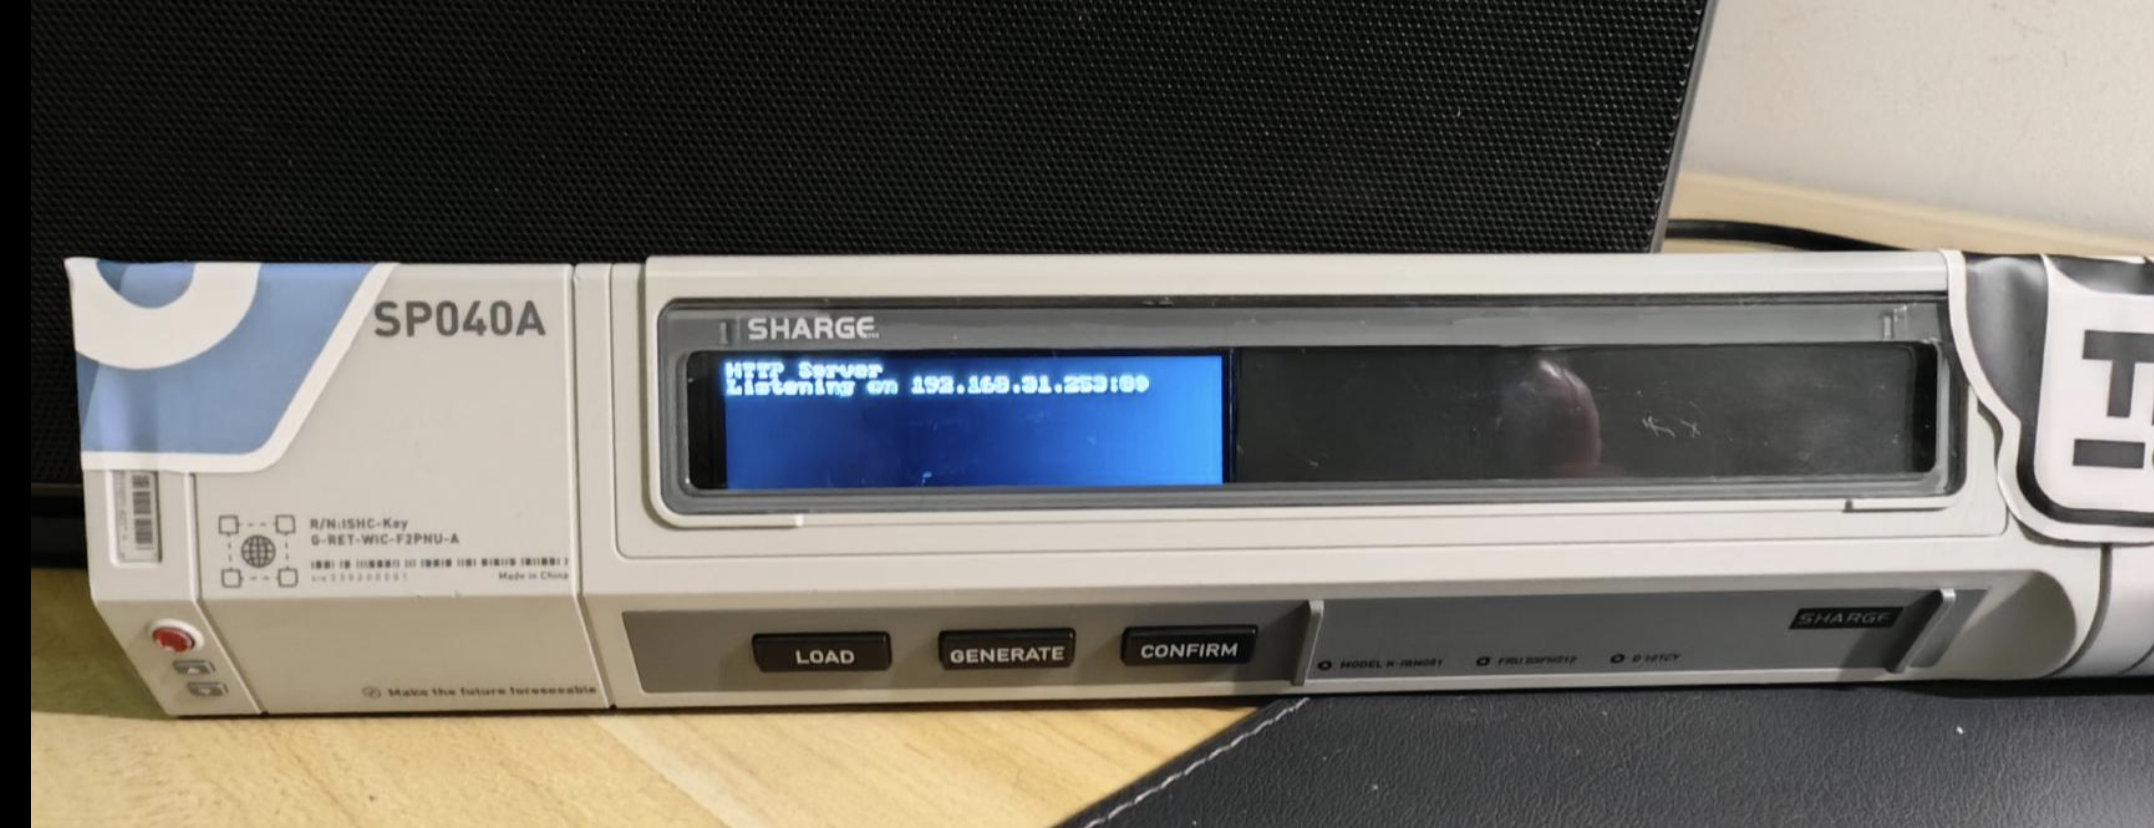
print(f'HTTP server started, listening address: http://{ip_address}:{port}')
display_text_on_tft(tft, f"HTTP Server\nListening on {ip_address}:{port}")
while True:
try:
conn, addr = s.accept()
print(f'Client connection from: {addr}')
handle_request(tft, conn)
except KeyboardInterrupt:
print("Server stopped")
break
except Exception as e:
print(f"Server error: {e}")
s.close()
|
Main function -> Screen initialization + Adapt height and width
  1
  2
  3
  4
  5
  6
  7
  8
  9
 10
 11
 12
 13
 14
 15
 16
 17
 18
 19
 20
 21
 22
 23
 24
 25
 26
 27
 28
 29
 30
 31
 32
 33
 34
 35
 36
 37
 38
 39
 40
 41
 42
 43
 44
 45
 46
 47
 48
 49
 50
 51
 52
 53
 54
 55
 56
 57
 58
 59
 60
 61
 62
 63
 64
 65
 66
 67
 68
 69
 70
 71
 72
 73
 74
 75
 76
 77
 78
 79
 80
 81
 82
 83
 84
 85
 86
 87
 88
 89
 90
 91
 92
 93
 94
 95
 96
 97
 98
 99
100
101
102
103
104
105
106
107
108
109
110
111
112
113
114
115
116
117
118
119
120
121
122
123
124
125
126
127
128
129
130
131
132
| import network
import time
import socket
from machine import Pin, SPI
import vga1_8x8 as font
import st7789
from show_text import display_text_on_tft
from http_server import connect_to_available_wifi, handle_request, start_http_server
# --------------------------
# --- ST7789 Display Pin Definitions ---
# Your wiring: SCL, SDA, RST, DC, CS -> GPI002, GPI003, GPI010, GPI006, GPI007
SCK_PIN = 2 # SCL pin (clock) -> GPI002
MOSI_PIN = 3 # SDA pin (data) -> GPI003
RST_PIN = 10 # RST pin (reset) -> GPI010
DC_PIN = 6 # DC pin (data/command) -> GPI006
CS_PIN = 7 # CS pin (chip select) -> GPI007
# -------------
# Initialize TFT object
spi = SPI(1, baudrate=10000000, polarity=0, phase=0, sck=Pin(SCK_PIN), mosi=Pin(MOSI_PIN))
dc = Pin(DC_PIN, Pin.OUT)
rst = Pin(RST_PIN, Pin.OUT)
cs = Pin(CS_PIN, Pin.OUT)
# Ensure CS pin initial state
cs.value(1)
time.sleep(0.01)
# Hardware reset sequence
rst.value(1)
time.sleep(0.01)
rst.value(0)
time.sleep(0.01)
rst.value(1)
time.sleep(0.12) # Wait for reset to complete
def test_display_basic():
"""Basic display test function"""
print("Starting basic display test...")
# Manually send basic commands for testing
def send_command(cmd, data=None):
cs.value(0)
dc.value(0) # Command mode
spi.write(cmd)
if data:
dc.value(1) # Data mode
spi.write(data)
cs.value(1)
time.sleep(0.01)
print("Sending basic initialization commands...")
send_command(b'\x01') # Software reset
time.sleep(0.15)
send_command(b'\x11') # Exit sleep
time.sleep(0.12)
send_command(b'\x29') # Display on
time.sleep(0.1)
print("Basic test completed")
def init_st7789_display(st_width, st_height, rotation=1):
"""Initialize ST7789 display"""
print(f"Initializing ST7789 display: {st_width}x{st_height}, rotation: {rotation}")
tft = st7789.ST7789(spi, st_width, st_height, reset=rst, cs=cs, dc=dc, rotation=rotation)
# rotation corresponds to MADCTL x36 register value
rotation_to_x36 = {
0: 0x00, # Default portrait
1: 0x60, # 90 degrees clockwise, landscape
2: 0xC0, # 180 degrees rotation
3: 0xA0, # 270 degrees clockwise
}
x36_value = rotation_to_x36.get(rotation, 0x00)
print(f"Memory access control value: {x36_value:#04x}")
# Select column and row address ranges based on rotation
if rotation % 2 == 0:
col_start, col_end = 0, 75 # width - 1
row_start, row_end = 0, 283 # height - 1
else:
col_start, col_end = 0, 283
row_start, row_end = 0, 75
init_commands = [
(b'\x01', None, 150), # Software reset
(b'\x11', None, 120), # Exit sleep mode
(b'\x3A', b'\x05', 10), # Set pixel format RGB565
(b'\x36', bytes([x36_value]), 10), # Memory access control
(b'\x2A', col_start.to_bytes(2, 'big') + col_end.to_bytes(2, 'big'), 10), # Column address set
(b'\x2B', row_start.to_bytes(2, 'big') + row_end.to_bytes(2, 'big'), 10), # Row address set
(b'\x21', None, 10), # Display inversion
(b'\x13', None, 10), # Normal display
(b'\x29', None, 100), # Display on
]
tft.init(init_commands)
print("init_commands finished")
test_display_basic()
# Test pixel display
try:
tft.pixel(0, 0, 0xFFFF) # Top left
tft.pixel(st_width // 2, st_height // 2, 0xF800) # Center point red
tft.pixel(st_width - 1, st_height - 1, 0xFFFF) # Bottom right
print(f"{st_width}x{st_height} display area set successfully")
return tft
except Exception as e:
print(f"Display test failed: {e}")
return None
# 135 x 240 display initialization
# Assuming you are using ST7789 display with resolution 135x240
# If you are using other models, adjust parameters accordingly
ST_WIDTH = 240 # Driver internally understands as width, but actually becomes height in landscape
ST_HEIGHT = 320
# Initialize TFT object
tft = init_st7789_display(ST_WIDTH, ST_HEIGHT, 3) # Rotation 3 means 270 degrees clockwise
def main():
"""Main program entry"""
print("--- ESP32-C3 ---")
tft.fill(st7789.BLACK) # Black background
display_text_on_tft(tft, "ESP32-C3 TFT Display\nReady to receive text...")
ip_address = connect_to_available_wifi()
start_http_server(tft, ip_address)
if __name__ == "__main__":
main()
|
Multi-line text display
 1
 2
 3
 4
 5
 6
 7
 8
 9
10
11
12
13
14
15
16
17
18
19
20
21
22
23
24
25
26
27
28
29
30
31
32
33
34
35
36
37
38
39
40
41
42
43
44
45
| from machine import Pin, SPI
import vga1_8x8 as font
import st7789
def display_text_on_tft(tft, text_content):
"""Display text content on TFT screen (5 lines, 35 character limit, line start x=20)"""
if not tft:
print("Error: TFT display not initialized.")
return
tft.fill(st7789.BLACK) # Black background
# Title bar
tft.text(font, "Received Text:", 20, 2, 0x07FF)
tft.text(font, "-" * 35, 20, 12, 0x07FF)
x_offset = 20 # Line start x coordinate changed to 20
max_chars_per_line = 35
y_start = 85 # Line start y coordinate changed to 85
line_height = font.HEIGHT + 1
max_lines = 5 # Display only 5 lines
lines = text_content.split('\n')
line_count = 0
for line in lines:
while len(line) > max_chars_per_line:
if line_count < max_lines:
y_offset = y_start + line_count * line_height
line_text = line[:max_chars_per_line]
print(f"Displaying line: {line_text} at y={y_offset}")
tft.text(font, line_text, x_offset, y_offset, st7789.WHITE)
line = line[max_chars_per_line:]
line_count += 1
else:
# Lines used up, display prompt
tft.text(font, "... (more)", x_offset, y_start + (max_lines - 1) * line_height, 0xF800)
return
if line_count < max_lines:
tft.text(font, line, x_offset, y_start + line_count * line_height, st7789.WHITE)
line_count += 1
else:
tft.text(font, "... (more)", x_offset, y_start + (max_lines - 1) * line_height, 0xF800)
return
|
Final effect
After putting it back, I found the display was reversed, couldn’t change the installation position, just modify the code.

Internal wiring
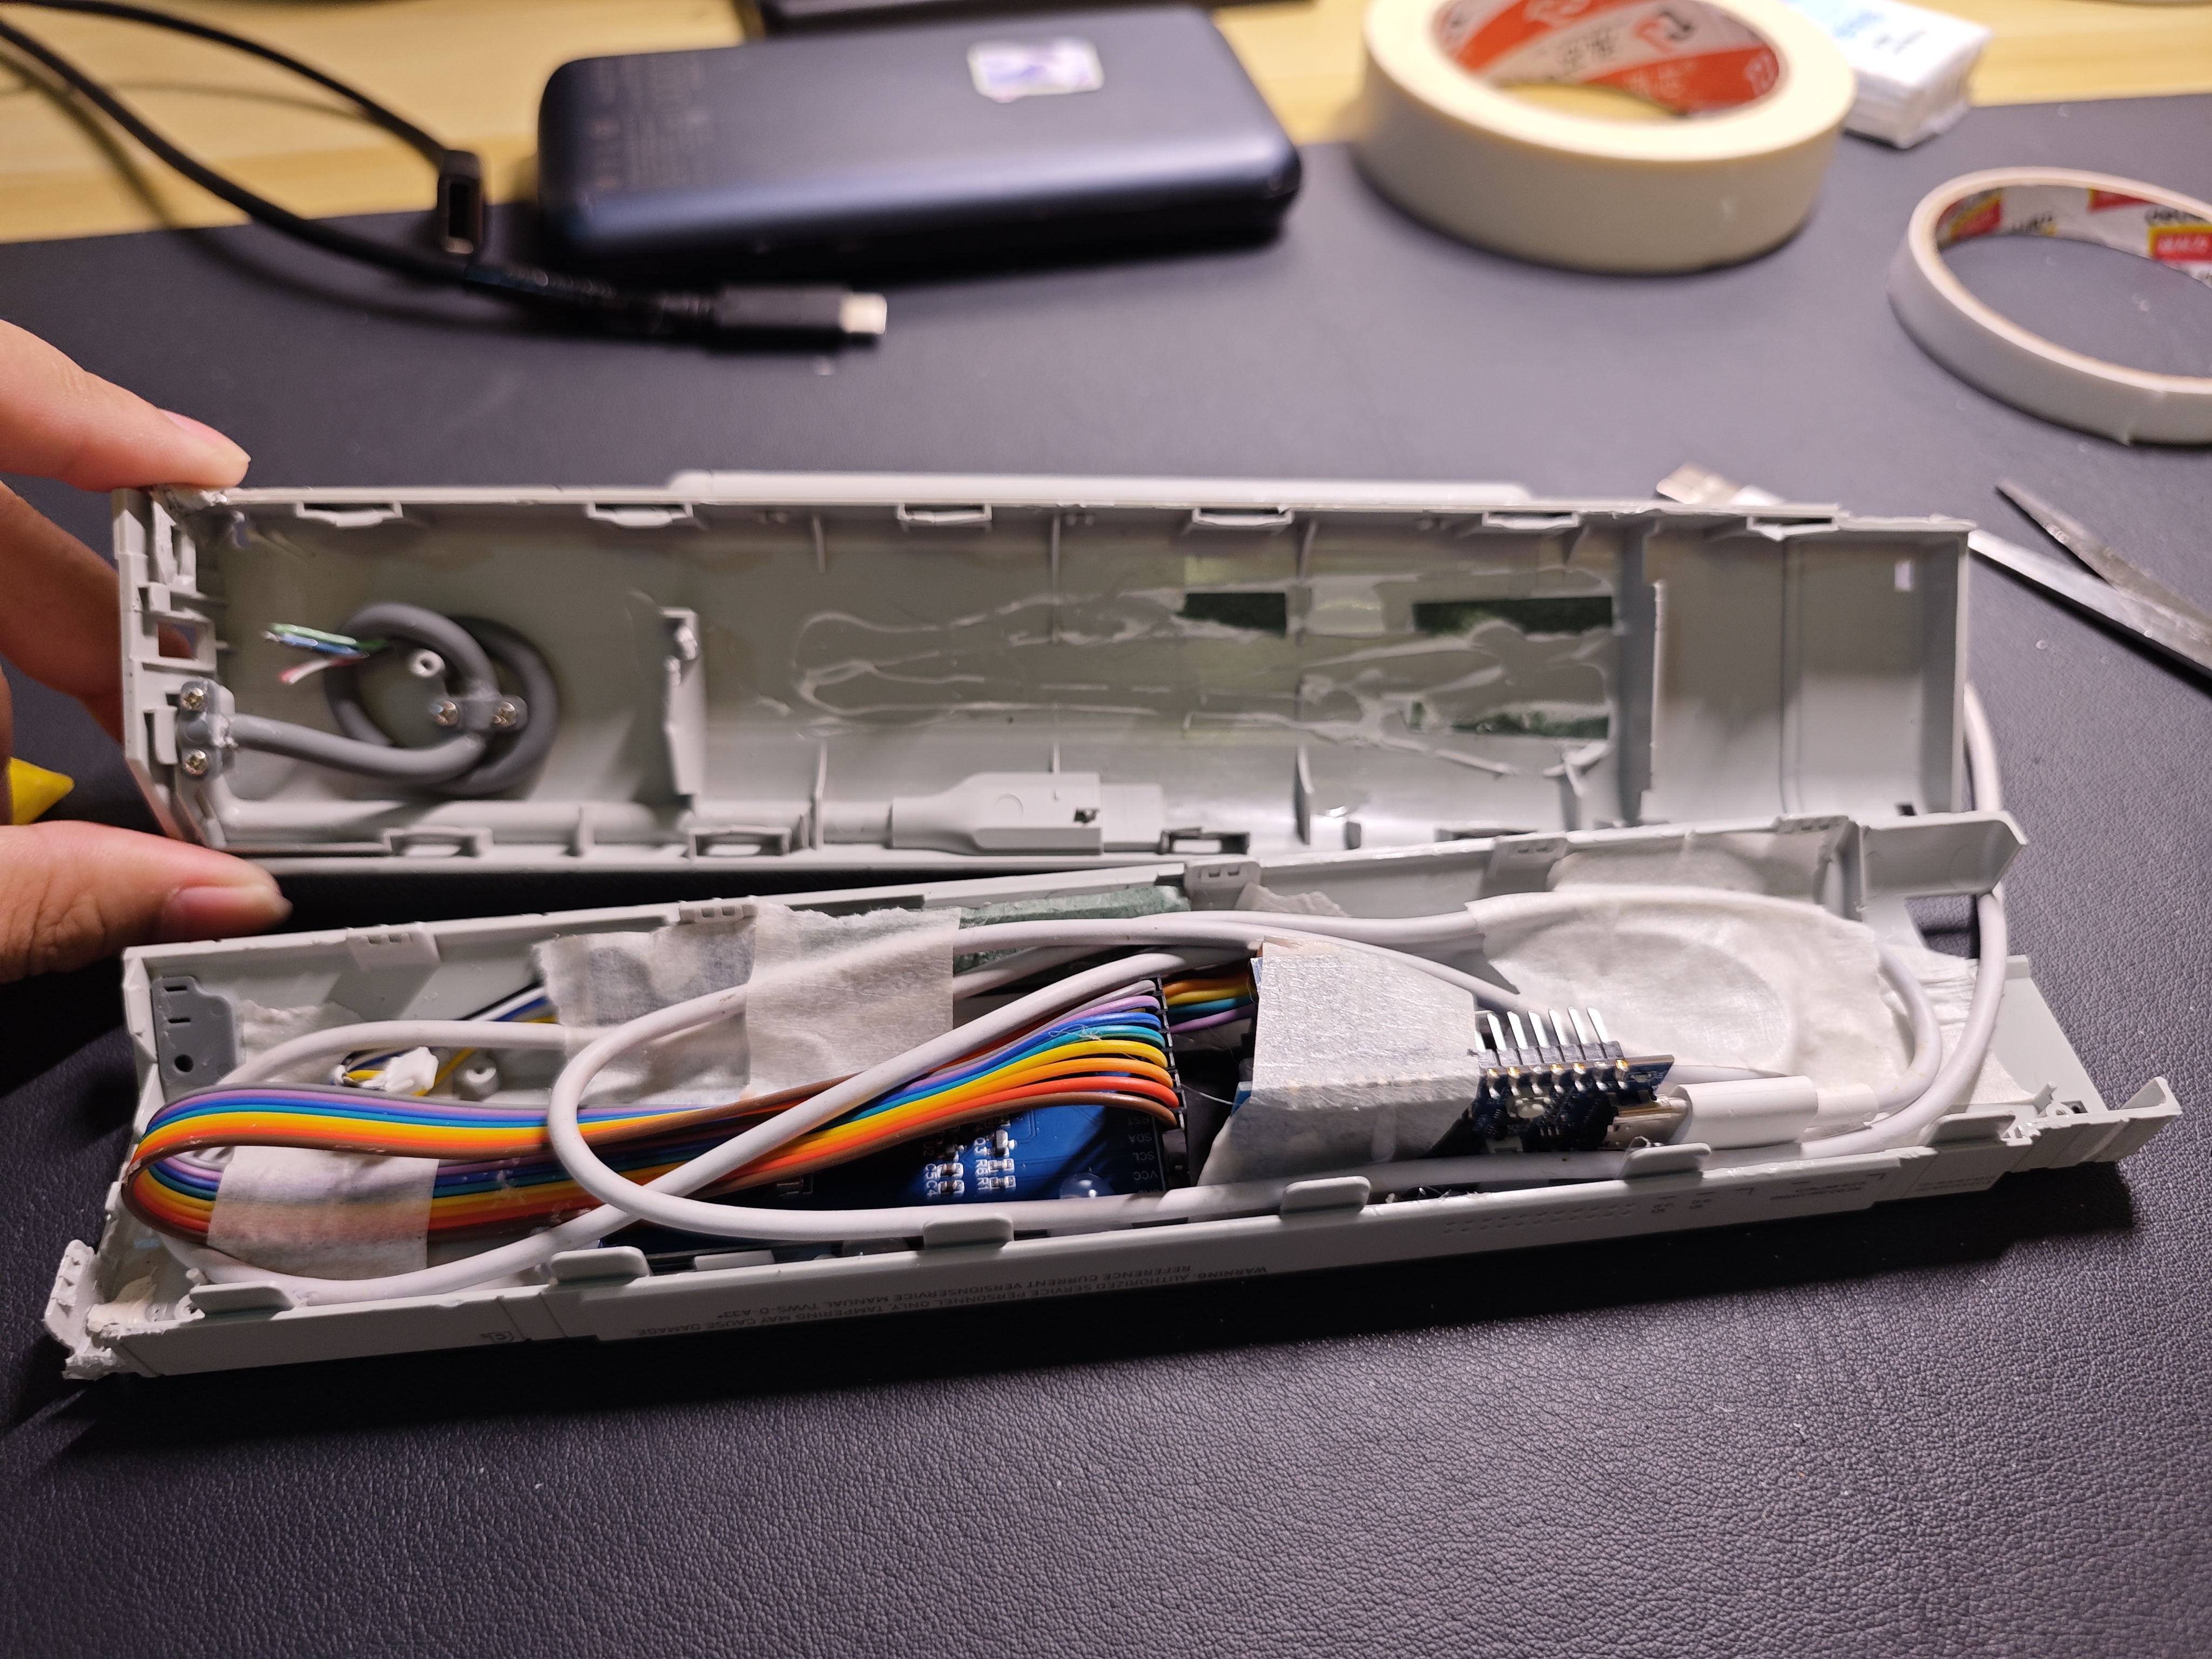
Put in a USB cable for power + data transmission
Summary
Because the screen size and driver supported size don’t match perfectly, the final solution was to implement cropping in code logic.
Also because when the screen size rotates, the memory address needs to be changed, I struggled with this for a long time.
The other code is all trial and error verification, no big problems.
Postscript -> “Friendly Advice”
This device is assembled with solid glue and snaps,
No possibility of later disassembly.
All disassembly is based on violence and destruction.
So:
The disassembly of this thing is a “destructive solution”, no non-destructive modification.
The disassembly of this thing is a “destructive solution”, no non-destructive modification.
The disassembly of this thing is a “destructive solution”, no non-destructive modification.
The internal screen didn’t find an adapted IC driver board,
The four power lines on the left and right sides are not very firmly soldered,
Easy to break during disassembly,
Normally hard to reuse this thing
(If friends have solutions, DM me.
Battery disassembly has fire risk, please operate carefully.
Battery disassembly has fire risk, please operate carefully.
Battery disassembly has fire risk, please operate carefully.
Finally.
Have fun~
Resource links: